Want to send unlimited marketing emails without paying $100+ every month to Mailchimp, ActiveCampaign, or SendGrid? In this step-by-step guide, I’ll show you how to install Mautic 7 and Postal on an Ubuntu 24.04 VPS using Docker Compose and Caddy. By the end, you’ll have your own free, self-hosted SMTP server and email marketing platform running on a cheap VPS — perfect for beginners, small businesses, and anyone tired of paying per-email fees.
This tutorial is written so that even a 5th-grader can follow along. Every command is in a copy-paste code box, and every step is explained in plain English.
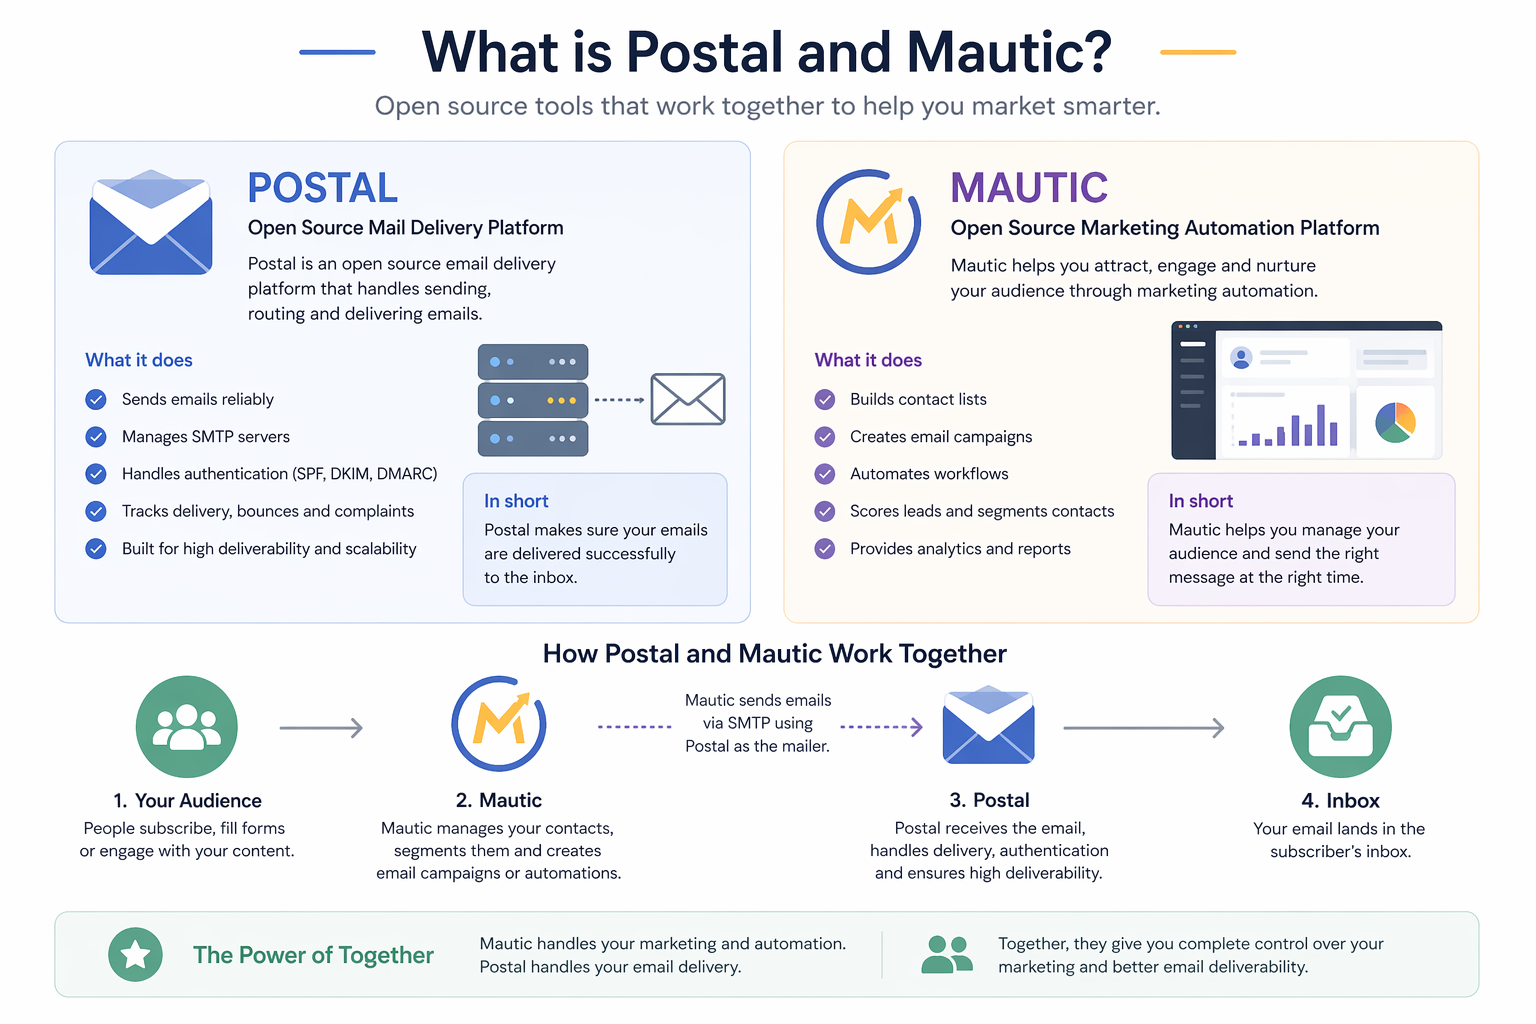
What Are Mautic and Postal?
Before we dive into the installation, let’s quickly explain the two tools you’re about to install and why they work so well together.
What is Mautic?
Mautic is a free, open-source email marketing and marketing automation platform. Think of it as a free alternative to HubSpot, ActiveCampaign, or Mailchimp. You can use it to build email lists, send newsletters, create drip campaigns, track opens and clicks, and automate marketing workflows — all without paying a monthly fee to a SaaS company.
Because it’s open-source, you own your data, your contacts, and your sending reputation. Nothing is locked behind a paywall.
What is Postal?
Postal is a free, open-source SMTP mail server built to send large volumes of email. It’s essentially a self-hosted version of Mailgun, SendGrid, or Amazon SES. When you combine Mautic with Postal, Mautic handles the marketing logic (lists, campaigns, segments) while Postal handles the actual email delivery (SMTP, bounces, tracking, reputation).
Why Use a Self-Hosted SMTP Server?
Here’s why this setup is so popular with beginners and bootstrappers:
- Massive cost savings. SendGrid and Mailgun charge roughly $15–$90+ per month once you get past a few thousand emails. A $6 VPS can send hundreds of thousands of emails per month.
- No per-email pricing. You pay one flat VPS fee — it doesn’t matter if you send 1,000 or 500,000 emails.
- You own your data. Your contact list stays on your server, not on someone else’s database.
- No account bans. Mailchimp and ActiveCampaign can suspend your account for any reason. With a self-hosted stack, you control everything.
- Better for learning. If you’re new to email marketing, running your own server teaches you how email, SMTP, DNS, and deliverability actually work.

What You’ll Need Before Starting
- A domain name you control (so you can set DNS records)
- A Ubuntu 24.04 VPS with at least 4 GB of RAM
- About 30–45 minutes of your time
- Basic copy-paste skills — that’s it
Step 1 — Set Up Your Ubuntu VPS on Hostinger
We’ll use Hostinger VPS (affiliate link) because it offers the cheapest reliable Ubuntu VPS plans on the market — usually around $5–$7 per month — and they let you deploy Ubuntu 24.04 in just a few clicks. If you’ve already got a VPS running Ubuntu 24.04 somewhere else, feel free to skip ahead to Step 2.
1.1 Create Your Hostinger Account
- Go to Hostinger VPS.
- Click Add to cart on the cheapest VPS plan (KVM 1 or KVM 2 both work, but I recommend KVM 2 for more RAM headroom).
- Create your Hostinger account with your email and a strong password.
- Choose the shortest billing term to start — you can always renew later.
- Complete the payment.
1.2 Deploy the VPS with Ubuntu 24.04
- From your Hostinger dashboard, open the VPS you just bought.
- When asked to choose an operating system, pick Ubuntu 24.04 (a clean install, not one of the preconfigured panel templates).
- Choose a data center close to your audience.
- Set a strong root password — write it down somewhere safe.
- Wait 2–3 minutes for Hostinger to provision the server.
When it’s ready, Hostinger will show you the server’s public IP address. We’ll refer to it as VPSIPADDRESS from here on — whenever you see that placeholder, swap in your real IP.
1.3 Connect to Your VPS via SSH
You now need to log into your VPS to run commands. Pick one of the two methods below.
Option A: Using Windows PowerShell (easiest)
Open PowerShell (press Windows key, type “PowerShell”, hit Enter), then run:
ssh root@VPSIPADDRESSType yes when it asks about the fingerprint, then paste your root password.
Option B: Using PuTTY
- Download PuTTY from the official site and open it.
- In the Host Name field, type your
VPSIPADDRESS. - Leave port 22.
- Click Open, accept the security alert, and log in as
rootwith your password.
You’re now inside your VPS. Everything from here on gets pasted into this terminal window.
Prefer a Different Host? Consider Contabo
If you later outgrow Hostinger or want a European data center with insanely cheap RAM, Contabo VPS is a fantastic alternative. Their entry plans start around €4.50/month and offer 8 GB of RAM — perfect once your mailing list grows. The installation steps below work exactly the same on any Ubuntu 24.04 VPS, so you can redo this tutorial on Contabo whenever you’re ready.
Step 2 — Configure DNS Records for Mautic and Postal
Before we install anything, we need to tell the internet that mautic.yourdomain.com and postal.yourdomain.com point to your new VPS. Skipping this step means SSL certificates won’t issue, emails will bounce, and you’ll rage-quit. Do this first.
Log in to whoever manages your domain (Cloudflare, Namecheap, GoDaddy, Hostinger, etc.) and open the DNS editor for your domain.
2.1 A Records (point subdomains to your VPS)
- Type: A Name:
mauticValue:VPSIPADDRESSTTL: Auto - Type: A Name:
postalValue:VPSIPADDRESSTTL: Auto
If you’re on Cloudflare, set the proxy status to DNS only (grey cloud, not orange) for postal.yourdomain.com. Mail servers and Cloudflare’s proxy don’t get along.
2.2 MX Record (tells the world which server handles your mail)
- Type: MX Name:
postalValue:postal.yourdomain.comPriority: 10
2.3 SPF, DKIM, and DMARC (the deliverability trio)
Postal will generate the exact SPF and DKIM values for you once it’s installed (Step 10). For now, just know that you’ll come back to your DNS panel later to add three more records:
- SPF (TXT) — proves that your VPS is allowed to send email for your domain.
- DKIM (TXT) — digitally signs every email Postal sends so inbox providers can verify it wasn’t tampered with.
- DMARC (TXT) — tells Gmail and Outlook what to do when SPF or DKIM fails (start with
p=none).
Good deliverability = more money. Don’t skip this part once Postal gives you the values.
Step 3 — System Preparation
Inside your SSH session, let’s make sure Ubuntu is fully up to date and has the basic tools we’ll need.
sudo apt update && sudo apt upgrade -yThis downloads the latest security patches. It can take 1–2 minutes — let it finish.
sudo apt install -y ca-certificates curl gnupg lsb-release git jq nanoWe’re installing helper tools:
ca-certificates,curl,gnupg,lsb-release— needed to securely add Docker’s and Caddy’s software repositories.git— used later to clone Postal’s installer.jq— a handy JSON parser.nano— the simple text editor we’ll use to paste config files.
Step 4 — Install Docker
Docker lets us run Mautic, its database, and Postal’s database as isolated containers. Think of containers as little mini-computers inside your VPS — clean, repeatable, and easy to remove.
curl -fsSL https://get.docker.com | shThis runs Docker’s official install script and sets up everything for us. Wait for it to finish.
sudo systemctl enable docker
sudo systemctl start dockerThese two commands make Docker start automatically every time your VPS boots, and start it right now.
Step 5 — Install Caddy Web Server
Caddy is a modern web server that automatically gets free SSL certificates from Let’s Encrypt. It will sit in front of Mautic and Postal and handle HTTPS for both. Zero configuration, zero cost.
sudo apt install -y debian-keyring debian-archive-keyring apt-transport-httpscurl -1sLf 'https://dl.cloudsmith.io/public/caddy/stable/gpg.key' | sudo gpg --dearmor -o /usr/share/keyrings/caddy-stable-archive-keyring.gpgcurl -1sLf 'https://dl.cloudsmith.io/public/caddy/stable/debian.deb.txt' | sudo tee /etc/apt/sources.list.d/caddy-stable.listThe three commands above add Caddy’s official software repository to Ubuntu. Now install Caddy itself:
sudo apt update && sudo apt install caddy -yStep 6 — Create the Mautic Directory and Docker Compose File
Now we’ll create a folder to hold Mautic and write the Docker Compose file that defines both the database and the Mautic app.
mkdir -p /opt/mautic
cd /opt/mauticWe make a new folder at /opt/mautic and move into it. Everything Mautic-related will live here.
nano docker-compose.ymlThis opens the nano text editor. Paste the exact content below — and replace every occurrence of YOURPASSWORD with your own strong password. Use the same password in all four spots so the database and Mautic can talk to each other.
services:
  db:
    image: mariadb:11
    container_name: mautic-db
    restart: unless-stopped
    environment:
      MYSQL_ROOT_PASSWORD: YOURPASSWORD
      MYSQL_DATABASE: mautic
      MYSQL_USER: mautic
      MYSQL_PASSWORD: YOURPASSWORD
    volumes:
      - ./db:/var/lib/mysql
  mautic:
    image: mautic/mautic:7-apache
    container_name: mautic
    restart: unless-stopped
    depends_on:
      - db
    ports:
      - "127.0.0.1:8080:80"
    environment:
      MAUTIC_DB_HOST: db
      MAUTIC_DB_USER: mautic
      MAUTIC_DB_PASSWORD: YOURPASSWORD
      MAUTIC_DB_NAME: mautic
      DOCKER_MAUTIC_ROLE: mautic_web
      MAUTIC_RUN_MIGRATIONS: "true"
MAUTIC_TRUSTED_PROXIES: '["0.0.0.0/0"]'Save the file by pressing Ctrl+O, then Enter, then Ctrl+X to exit.
Now start Mautic:
docker compose up -dDocker will download MariaDB and Mautic images and spin them up in the background. Wait about 2 minutes for the database to fully initialize before moving on — if you rush Mautic’s installer, it’ll fail to connect.
Step 7 — Configure Caddy as a Reverse Proxy for Mautic
Right now Mautic is only listening on port 8080 inside the VPS. Caddy will expose it to the world on HTTPS.
sudo nano /etc/caddy/CaddyfileDelete everything already in the file and paste this:
mautic.yourdomain.com {
    @blocked {
        path /.git*
        path /wp*
        path /public/*.php
    }
    respond @blocked 404
    reverse_proxy localhost:8080 {
        header_up X-Forwarded-Proto https
        header_up X-Forwarded-Port 443
    }
}Here’s what this does in plain English:
- Caddy listens for traffic to
mautic.yourdomain.comand automatically issues a free SSL certificate. - It blocks bot requests for
/.git,/wp, and other common WordPress exploit paths (Mautic is not WordPress, so these should always 404). - It forwards the valid traffic to Mautic on port
8080and tells Mautic “this request came in over HTTPS” via headers.
Save with Ctrl+O → Enter → Ctrl+X, then restart Caddy:
sudo systemctl restart caddyStep 8 — Run the Mautic Installation Wizard
Open your web browser and go to:
https://mautic.yourdomain.com
You should see the Mautic installation wizard. Fill in the database section exactly like this:
- Database Host:
db - Database Port:
3306(default) - Database Name:
mautic - Database User:
mautic - Database Password:
YOURPASSWORD(the one you set in the Docker Compose file)
Click next, then create your admin account with your email address and a strong password. Finish the wizard, and you should land on the Mautic dashboard.
Step 9 — Fix local.php to Enforce HTTPS
We do this step to fix the HTTPS issue — to make sure HTTPS is enforced everywhere inside Mautic. Without it, Mautic sometimes generates tracking links or login redirects that use http://, which breaks cookies, campaign tracking, and cross-domain logins.
Enter the Mautic container:
docker exec -it mautic bashYou’re now “inside” the Mautic container. Install nano so we can edit files:
apt-get update && apt-get install -y nanoOpen Mautic’s main config file:
nano /var/www/html/config/local.phpFind these two lines (they’ll currently hold empty arrays):
'trusted_hosts' => array(
),
'trusted_proxies' => array(
),Replace them with:
'trusted_hosts' => array('mautic\\.yourdomain\\.com'),
'trusted_proxies' => array('0.0.0.0/0'),Next, find this line:
'cookie_secure' => true,Change it to:
'cookie_secure' => false,Save with Ctrl+O → Enter → Ctrl+X. Clear Mautic’s cache:
php /var/www/html/bin/console cache:clearExit the container and restart Mautic:
exit
docker restart mauticStep 10 — Set Up Cron Jobs for Mautic Automation
Mautic is event-driven: campaigns, segments, and broadcasts only fire when their background jobs run. Cron is what triggers those jobs.
sudo crontab -eIf asked to choose an editor, press 1 to pick nano. Paste the following at the bottom of the file:
# Mautic Core Jobs - every 3 minutes
*/3 * * * * docker exec -u www-data mautic bash -c "php /var/www/html/bin/console mautic:segments:update && php /var/www/html/bin/console mautic:campaigns:update && php /var/www/html/bin/console mautic:campaigns:trigger && php /var/www/html/bin/console mautic:broadcasts:send && php /var/www/html/bin/console mautic:messages:send" > /dev/null 2>&1
# Mautic Maintenance - runs daily at 2:00 AM
0 2 * * * docker exec -u www-data mautic php /var/www/html/bin/console mautic:maintenance:cleanup --days-old=14 > /dev/null 2>&1Save with Ctrl+O → Enter → Ctrl+X. Mautic will now update segments, trigger campaigns, and send broadcasts every 3 minutes.
Step 11 — Install Postal (Your Free SMTP Server)
Now we install Postal, the app that actually pushes emails out to Gmail, Outlook, Yahoo, and every other inbox on the planet.
11.1 Create the Postal Directory and Clone the Installer
sudo mkdir -p /opt/postal
cd /opt/postalsudo git clone https://github.com/postalserver/install /opt/postal/install
sudo ln -s /opt/postal/install/bin/postal /usr/bin/postalThe first command downloads Postal’s official installer from GitHub. The second creates a shortcut so we can just type postal anywhere instead of the full path.
11.2 Start Postal’s Database on Port 3307
We put Postal’s database on port 3307 so it doesn’t conflict with Mautic’s database on 3306.
docker run -d \
--name postal-mariadb \
-p 127.0.0.1:3307:3306 \
--restart always \
-e MARIADB_DATABASE=postal \
-e MARIADB_ROOT_PASSWORD=YOURPASSWORD \
mariadb:10.11Remember to replace YOURPASSWORD with your real strong password (it can be a different password from the Mautic one — but keep both written down somewhere safe).
11.3 Bootstrap Postal’s Config
postal bootstrap postal.yourdomain.comThis generates the initial config at /opt/postal/config/postal.yml. Open it so we can plug in our database details:
sudo nano /opt/postal/config/postal.ymlFind the main_db: and message_db: sections and make them match this exactly (using your password):
main_db:
host: 127.0.0.1
port: 3307
username: root
password: YOURPASSWORD
database: postal
message_db:
host: 127.0.0.1
port: 3307
username: root
password: YOURPASSWORD
prefix: postalSave with Ctrl+O → Enter → Ctrl+X.
11.4 Initialize the Postal Database
postal initializeThis creates all the database tables Postal needs.
11.5 Create the Postal Admin User
postal make-userFollow the prompts to enter your email, first name, last name, and a password. This is the account you’ll use to log in to the Postal web interface.
11.6 Start Postal
postal startStep 12 — Add Postal to the Caddyfile
Last piece. We need Caddy to also serve postal.yourdomain.com over HTTPS.
sudo nano /etc/caddy/CaddyfileAdd the Postal block below your existing Mautic block so the whole file looks like this:
mautic.yourdomain.com {
    @blocked {
        path /.git*
        path /wp*
        path /public/*.php
    }
    respond @blocked 404

    reverse_proxy localhost:8080 {
        header_up X-Forwarded-Proto https
        header_up X-Forwarded-Port 443
    }
}
postal.yourdomain.com {
reverse_proxy localhost:5000
}Save with Ctrl+O → Enter → Ctrl+X, then restart Caddy:
sudo systemctl restart caddyOpen your browser and visit https://postal.yourdomain.com — You should see the Postal login screen. Log in with the admin user you created in Step 11.5.
Inside Postal: create an organization → create a mail server → add your sending domain → copy the SPF and DKIM DNS records Postal generates and paste them into your DNS provider. Once the domain verifies, generate an SMTP API key — this is what you’ll paste into Mautic’s email settings so Mautic sends its campaigns through Postal.
Final Summary
| Service | URL | Password |
|---|---|---|
| Mautic | https://mautic.yourdomain.com | your chosen admin password |
| Postal | https://postal.yourdomain.com | set during postal make-user |
| Mautic DB | internal | YOURPASSWORD |
| Postal DB | internal port 3307 | YOURPASSWORD |
Important Notes Before You Send Your First Campaign
- Port 25 must be open on your VPS. Many hosts block outbound SMTP on port 25 by default. If emails aren’t sending, open a support ticket with Hostinger (or whichever host you’re on) and ask them to unblock SMTP port 25.
- DNS records must propagate first. The A record for
postal.yourdomain.comhas to point to your server IP before Postal (via Caddy) can issue an SSL certificate. Give DNS up to 30 minutes. - Cron runs every 3 minutes. Campaigns won’t fire the instant you hit “send” — wait up to 3 minutes after any trigger event.
- Test tracking from a real email. Always test campaign links by clicking them from inside a Mautic email, not by pasting the tracking URL into your browser. The latter will look broken even when it’s working fine.
- Warm up your IP slowly. Don’t blast 10,000 emails on day one. Start with 50–100/day to known good contacts and scale up over 2–3 weeks so Gmail trusts your reputation.
Frequently Asked Questions
How much money does a self-hosted Mautic + Postal setup actually save?
At 50,000 emails/month, Mailchimp or SendGrid charges around $270-$450/month. A Hostinger VPS running Mautic + Postal $8/month total, flat — no matter how many emails you send. You can upgrade to 12$, 20$ and more plans that offer more RAM, CPU cores and disk space – only if you need. Over a year, you save between $1000 to $5000 per list tier.
Is this setup safe for beginners?
Yes. Every command in this tutorial is copy-paste. Caddy handles SSL for you automatically, and Docker keeps Mautic and its database cleanly isolated. The riskiest part — email deliverability — is solved by Postal’s guided DNS setup (SPF, DKIM, DMARC).
Why use Docker Compose instead of installing Mautic directly?
Docker Compose means Mautic, MariaDB, and all their PHP extensions are pre-packaged. You skip hours of LAMP-stack configuration, and if something ever breaks, you can docker compose down && docker compose up -d to get back to a clean state in seconds.
Do I really need SPF, DKIM, and DMARC records?
Yes, absolutely. Without them, Gmail and Outlook will mark almost every email as spam. Postal generates the exact values you need inside its admin panel — just copy them to your DNS provider.
Can I use any VPS host, or do I have to use Hostinger?
Any Linux VPS running Ubuntu 24.04 with at least 4 GB RAM works. Hostinger and Contabo are the cheapest reliable options in 2026. Avoid providers that block outbound port 25 without a way to unblock it — mail servers will not work there.
How do I keep Mautic and Postal secure after setup?
Enable UFW (Ubuntu’s firewall) and allow only ports 22, 25, 80, 443, and 587. Use a long, random root password or — better — disable root password login and use SSH keys. Update the system weekly with sudo apt update && sudo apt upgrade -y. Keep your Mautic and Postal admin passwords in a password manager, never reused.
Conclusion: You Just Built a $500/year Email Stack for $6/month
That’s it — you now own a production-grade email marketing platform. Mautic handles the campaigns; Postal handles the deliverability; Caddy handles HTTPS. No monthly SaaS bill. No contact limits. No surprise account suspensions.
If you haven’t spun up your server yet, grab a VPS on Hostinger (affiliate link — cheapest Ubuntu VPS plans) or consider Contabo if you want more RAM for the same money. Either one will run this stack perfectly.
Want me to do all of this for you? If this guide looks intimidating, or you just don’t have time to set it up, I offer a done-for-you installation service. I’ll deploy Mautic 7 and Postal on your VPS, configure DNS, warm up your sending IP, and hand you a working email marketing stack ready for your first campaign. Contact me here and I’ll get you sending within 48 hours.
Happy sending — and here’s to never paying another SaaS email bill again.